
#1: Open a picture into your editing software. I edit with Photoshop Elements 8 and I use all FREE actions from PW and The Coffee shop. So I am not sure if other software has everything I use. FYI.
I then do a quick clean up of my photo by using the enhance auto levels or Shift+Ctrl+L (I don't use this for every photo I only do it if I am in a hurry.)

#2: I use the same step as above but do the contrast.

#3: again the same step but do the color correction.

#4: I then use one of The Coffee Shop’s FREE actions. Called S-Curve POP and then adjust the opacity to my liking.

#5: I then used one of the Pioneer Women’s FREE Action called Edge burn and again adjust the opacity to my liking. (you don't always need to use this step but I did because I knew that by the end I wanted to have a dramatic frame around him.)

#6: I then used another Pioneer action called Boost and adjusted the “Zing” opacity to my liking.

#7: I then switch from “full” edit to “guide” edit and used the adjust skin tones and then used the eyedropper. I do this step because I noticed that it will give it a nice even tone on is face when its in B&W (the better your photo is the better it looks in B&W)

#8: I then switch back to “full” edit mode and click on the “smart brush” tool on the left and choose the “photographic” option in the drop down menu then scroll down and pick the “instant photo” option and brush it on my entire photo. (YOU NEED TO DO THIS BECAUSE WHEN I SWITCH IT TO B&W THIS WILL MAKE IT NOT BE SO DARK!!)

#9: You then can also change the opacity on it too.

#10: I then use the “smart brush” tool again which it should still be in the “photographic” menu but then this time I scroll down to the “TIN TYPE” option. This is what will turn it into b&w. I brush it over the entire photo.

#11: You can change the opacity on this also which I do some times to get vintage looking photos or you can use the + or – in the brushes and just highlight some of the photo. just play around with it.

12: once I am done I ALWAYS!!!! reduce the noise because you just did a ton to the photo which WILL make it noisy. I don't have a noise software but I discovered that in the filters (which you see I circled on the top over there on the right.) that they have an action for you called “Noise” I click into…

#13: You want to use the last action in there called “reduce noise” it will pop up this box and DEPENDING on how much noise is on the photo you will want to adjust the COLOR NOISE and/or strength. (don't mess with the middle one TRUST me.) the box will show you what it will make your photo look like DONT over do it. because then your photo will look like poo. Click ok when you like it.

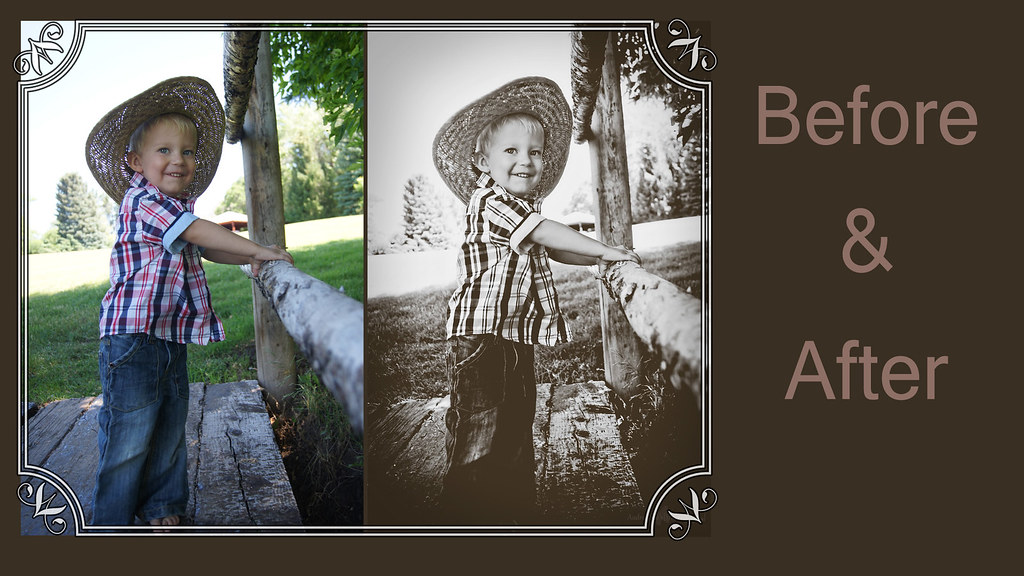
That’s it! SOOO simple. and it makes a pretty cool B&W right?
Now I use a lot of the smart tool options, my favorites are:
1. Tin Type
2. Instant photo
3. Neutral tone B&W
(those are all in the photographic menu.)
4. Cool tone B&W (which is in the Black and White Menu.)
5. I use all the ones in the Lighting menu
Let me know if you have any questions!


You are way too awesome - I figured there was an action for all of that. I'll have to try your steps later today because I love the way this look. You rock!
ReplyDeleteAw, these pictures are so sweet! Great edit and I loved the tutorial. Hi! It's been a while. :)
ReplyDeletegreat edit, and great tutorial!
ReplyDeleteFabulous tutorial. Thank you for sharing.
ReplyDeleteMarla @ www.blueskiesphotoblog.com
Great tutorial! I have not tried a lot of those smart tools so I will def be following this and giving some of them a try!
ReplyDeleteSo I tried it in elements but I don't think smart tools are available in CS5 so I need to keep playing with it some more. Thanks again!
ReplyDeletethis is fabulous! I have never used any of the smart tools, but I really love how your edit turned out so I might have to try!
ReplyDeleteI tried it! I love how it turned out! http://www.andthen-shesnapped.com/2011/07/matriarch.html
ReplyDeleteNice tutorial---now I know your b&w secret! :D **Off to see if I can duplicate this in picnik**
ReplyDeleteGreat tutorial! I have not tried a lot of those smart tools so I will def be following this and giving some of them a try!
ReplyDelete